


How to Configure the UNITY Tactical AXON with the Wilcox RAID Xe
The Wilcox RAID Xe is a compact laser aiming and illumination system designed for demanding low-light applications. When paired with the UNITY Tactical AXON or AXON XL, it offers a configurable remote-control interface that lets users assign functions to individual buttons.
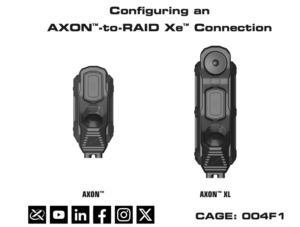
Connecting these systems requires the correct junction box and proper configuration of the RAID Xe’s remote-control menu. This guide covers the required components, available operating modes, and the key programming considerations outlined in Wilcox Industries’ February 2026 AXON-to-RAID Xe configuration instructions.
What You Need to Connect the AXON to the RAID Xe
Before configuring the controls, confirm that you have the correct hardware for your setup. Wilcox specifies that a UNITY Junction Box, part number 65337G01, is required to connect an AXON or AXON XL to the following RAID Xe models:
- 65300G12: RAID Xe Low Power, red visible laser
- 65300G14: RAID Xe High Power, red visible laser
- 65300G18: RAID Xe High Power, green visible laser
Custom Night Vision offers the Wilcox Junction Box for RAID Xe and BOSS compatible with UNITY Tactical AXON. This component is designed to provide the connection needed for compatible three-button AXON pressure switches.
Important: Connect the AXON to the RAID Xe before beginning the configuration process. For additional product-specific information, consult the applicable Wilcox RAID Xe Operator’s and Maintainer’s Manual.
Understanding the RAID Xe Remote-Control Menu
The RAID Xe includes a remote-control menu that allows users to assign supported functions to the connected switch’s buttons. The exact functions available depend on the selected RAID Xe configuration.
To access the menu, press the RAID Xe’s Up and Down buttons simultaneously. Use either button to navigate to Remote, then press Enter. Select the button number you want to configure and choose the desired operating mode.
Repeat the process for other buttons as needed. Press the Up and Down buttons simultaneously again to exit the Function Menu.
Available RAID Xe Remote Functions
Wilcox’s configuration instructions identify the following options in the RAID Xe Remote submenu:
- AL V: Low-power visible aiming laser
- AL I: Low-power infrared aiming laser
- IL I: Low-power infrared illuminator
- ILrL: Low-power infrared LED illuminator
- DL I: Dual low-power infrared laser and illuminator
- AH V: High-power visible aiming laser
- AH I: High-power infrared aiming laser
- IH I: High-power infrared illuminator
- DH I: Dual high-power infrared laser and illuminator
- Fire: Activates the current laser selected by the Mode Selection Knob
Some options are configuration-dependent. Wilcox notes that high-power laser configurations are limited to the maximum low-power setting when the device’s Mode Selection Knob is in a low-power position.
Programming the AXON for RAID Xe Control
For standard AXON-to-RAID Xe control, each of the available remote buttons can be assigned a supported function through the RAID Xe’s menu. This lets users select a control arrangement suited to their preferred switch interface.
One manufacturer-specified requirement is especially important: Button 1 on the RAID Xe must always be programmed to the same mode as Button 3 when configuring either the AXON or AXON XL.
After selecting a button, navigate to the desired mode and press Enter to save the selection. Repeat the process for each button that needs to be configured, then exit the menu.
Configuring Visible-Laser Override
Wilcox also documents a dedicated configuration for the AXON’s visible-laser override function. This setup assigns the high-power visible aiming laser mode to Buttons 1 and 3, while Button 2 is assigned to the Fire function.
The manufacturer specifies the following assignments:
- Button 1: AH V
- Button 2: Fire
- Button 3: AH V
To apply this configuration, access the Remote menu and program each button individually. Exit the menu after completing the assignments. Confirm that the connected hardware and RAID Xe model support the intended configuration before use.
Understanding the AXON Button Layout
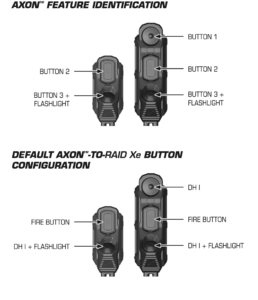
The physical button arrangement differs between the standard AXON and the larger AXON XL. Wilcox’s instruction manual illustrates the button locations and the default AXON-to-RAID Xe configuration.
The illustrated layout identifies Buttons 1, 2, and 3, with Button 3 also associated with the flashlight function on the AXON. The default configuration diagram shows the DH I mode and the corresponding Fire-button arrangement.
Because button assignments can be changed through the RAID Xe’s menu, the physical position of a button does not necessarily tell you which function it will activate. Verify the programmed settings rather than assuming the switch is using its default configuration.
Choosing the Right RAID Xe and AXON Components
The correct setup begins with selecting compatible hardware. The RAID Xe is available in multiple configurations, while the AXON family includes different switch layouts and cable options. Confirming the laser model, junction box, and switch compatibility before purchasing can help prevent unnecessary installation issues.
Explore the following products at Custom Night Vision:
- Wilcox RAID Xe Civilian Power Laser
- Wilcox RAID Xe High-Power Laser
- Wilcox UNITY-Compatible Junction Box
- Wilcox ERGOCTO RAID Xe Dual-Cable Remote
Final Considerations
Configuring the UNITY Tactical AXON with the Wilcox RAID Xe requires the appropriate junction box, a compatible switch, and correct button assignments. Following the manufacturer’s instructions helps ensure the remote functions correspond to the intended settings.
Before operating the system, verify all connections and settings against the applicable manufacturer manuals. Treat every laser as potentially hazardous, never direct a laser toward a person’s eyes, and follow the applicable laser-safety procedures and restrictions for your device.
For help selecting compatible RAID Xe components and accessories, visit Custom Night Vision’s Wilcox Industries collection or contact our team.
Frequently Asked Questions
Does the UNITY AXON connect directly to the Wilcox RAID Xe?
Wilcox’s instructions specify a UNITY Junction Box, part number 65337G01, for connecting the AXON or AXON XL to the RAID Xe models listed in the manual.
Can the RAID Xe buttons be programmed independently?
The RAID Xe Remote menu allows users to assign supported functions to individual button positions. However, Wilcox specifies that Button 1 must always be programmed to the same mode as Button 3 for both the AXON and AXON XL configurations covered by these instructions.
What does the Fire function do?
According to Wilcox’s manual, Fire activates the current laser selected by the RAID Xe’s Mode Selection Knob.
Where can I find the official configuration instructions?
Refer to Wilcox Industries’ document, Configuration of UNITY Tactical’s AXON: Configuring an AXON-to-RAID Xe Connection, document number 10000QR02, Revision A-2, dated February 23, 2026. The applicable RAID Xe operator and maintainer documentation should also be consulted.